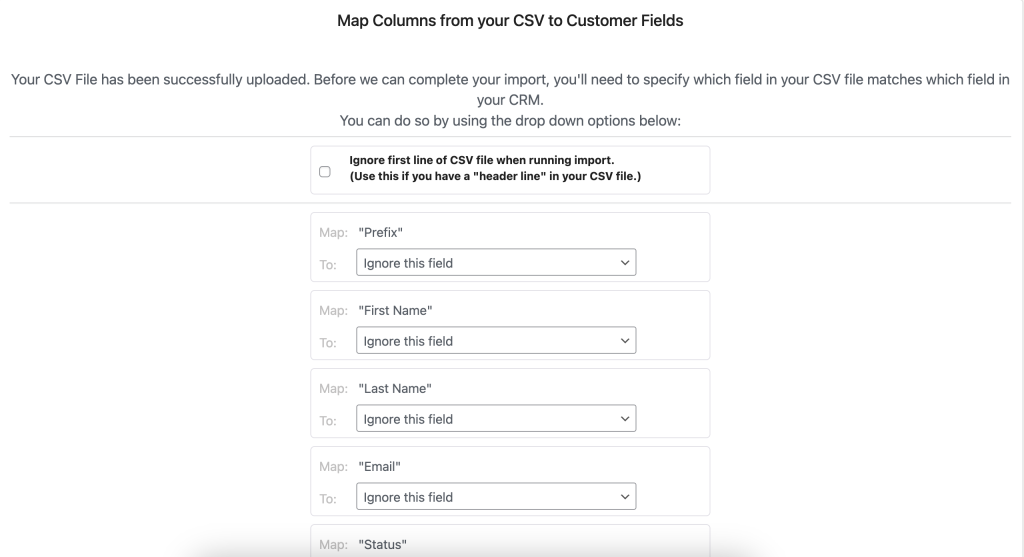
While there are other guides on CSV Importer (free and Pro), this guide is specifically about the Mapping step, which we think would benefit from a clear explanation. If you’re looking for a general guide, please see Getting started with CSV Importer.
Mapping tells Jetpack CRM which of your spreadsheet columns should be assigned to which Jetpack CRM contact fields.
As you can imagine, this is an important step since it hugely affects what data is imported, and where it gets added to each contact. For example, you don’t want a telephone number being added as an email address in Jetpack CRM.
How to map fields in CSV Importer (Free or Pro)
Follow these steps to map fields from your CSV file to your Jetpack CRM fields (including custom fields, if using CSV Importer Pro).
- If you’re using CSV Importer Pro, make sure the extension is installed and activated. If you’re using the free CSV Importer that’s included with Jetpack CRM, skip this step.
- From the top menu on any Jetpack CRM admin page, go to Tools > CSV Importer (Pro).
- Click the “Choose File” button, and select your CSV file. Then click the “Start CSV Import Now” button.
You should now be on the “Jetpack CRM CSV Importer: 2. Map Fields” page, where you’ll see a series of dropdown lists. Each of those items allows you to map one CSV field (spreadsheet column) to a corresponding Jetpack CRM field.
- If your CSV file has a header line, meaning the first row contains titles for each column, you will need to enable the “Ignore first line of CSV file when running import.” option. This will prevent your title row getting imported as a customer.
- Go through the list and map each item. Jetpack CRM assigns “Ignore this field” by default. You can leave that setting for any field you do not want to import. You’ll need to map at least one field in order for the import to work.
For example, let’s say the email field in your CSV file is called “Email Address”. To map that field, click the dropdown list for the “Email Address” field. Select “Email” from the dropdown list to map the “Email Address” field from the CSV file to the Jetpack CRM “Email” field. That means Jetpack CRM will add the email address from the “Email Address” field in the CSV file as the email address for the contact.
- Check through all of your field mappings to make sure they are correct. It’s not possible to undo a CSV import, so it’s incredibly important to make sure everything is correct beforehand.
- Click the “Continue” button and continue with the rest of the CSV import.
What about custom fields?
Importing custom fields requires the CSV Importer Pro extension. With that installed, you will also have the option of mapping custom fields from your CSV file into custom fields you’ve created in Jetpack CRM.
You can learn more about importing custom fields with CSV Importer Pro here.
How to map Company fields?
Company fields can also be mapped with CSV Importer PRO, so that extension will first need to be installed and activated.
Next, go to Jetpack CRM > Core Modules and make sure the “B2B Mode” module is enabled.
After that, you can follow the standard CSV importer steps, where you’ll have the option to map all of the company fields from your CSV file to their corresponding Jetpack CRM company fields.
Two things must be in the contact row to map a contact to a company.
- Company Name – as it appears in the Jetpack CRM company record
- Company Email address – as it appears in Jetpack CRM company record
Example CSV file
First Name,Last Name,email,company name,company email
klaus,harris,klaus@foo.co.uk,TestCo,contact@testco.co.uk
klausA,harrisA,klausA@foo.co.uk,TestCo,contact@testco.co.uk
In the mapping part of the import process, the company fields we need to map are:
- Co. Name
- Co. Main Email Address


